Administration panel
The administration panel consists of a set of tools designed for adjustment and control of system elements. Only authorized users may work with the administration panel, who have certain rights of access.
It is possible to select the following tools of control among main tools of control:
- adding, deletion and edition of system elements (users, layers, reports etc.);
- data export, downloading and indexing;
- granting administration authorization to other users;
- forming of reports.
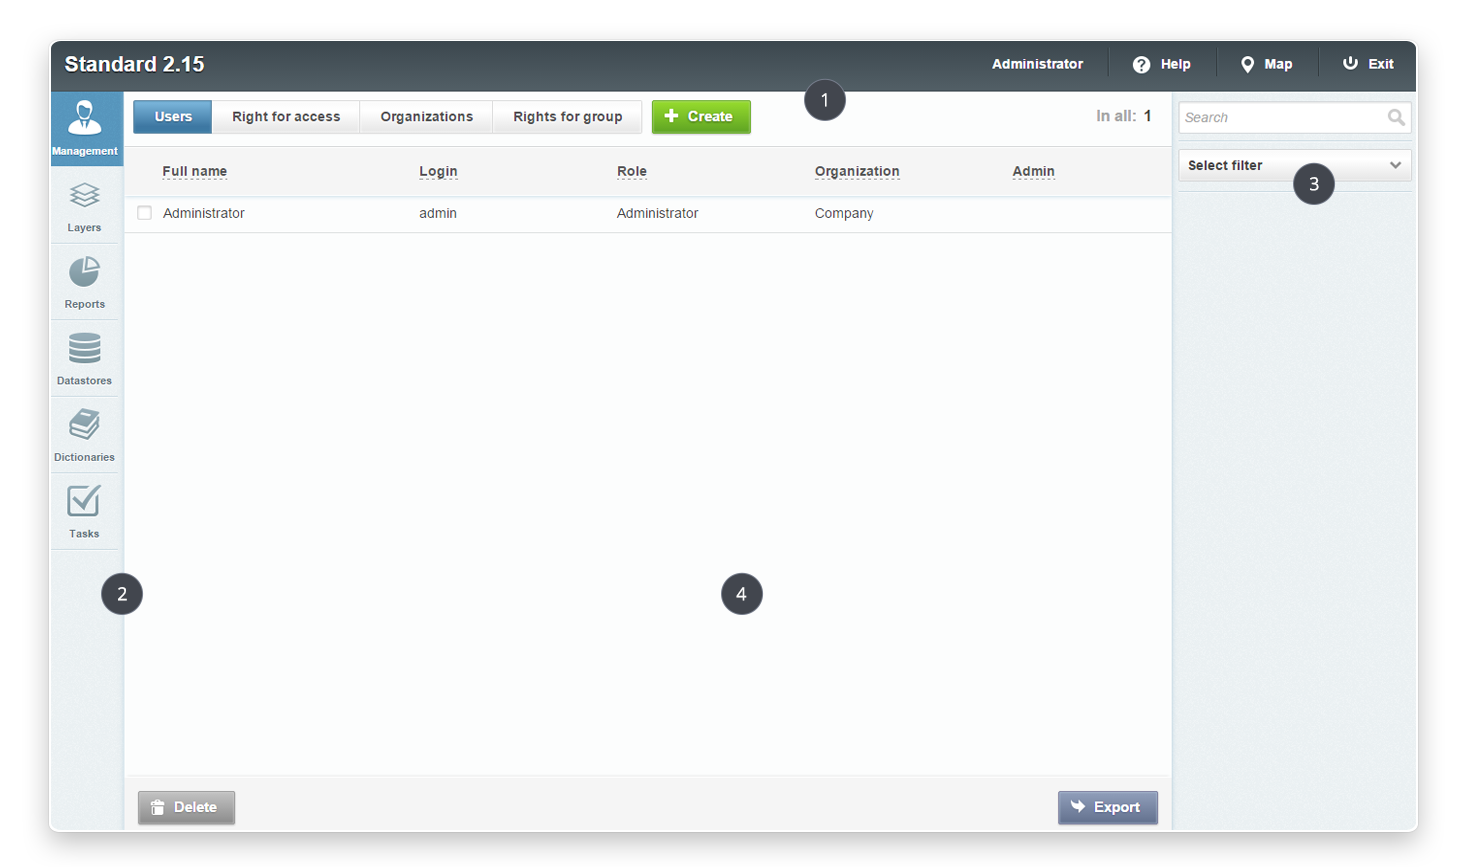
The administration panel in Geoportal system is divided into following units:
| 1. | Toolbar The toolbar has buttons for going to the profile, help, map and exit from system. |
|---|---|
| 2. | Menu This unit includes main tools for system control. |
| 3. | Search box The search box and filtration are necessary for search of specific elements of system. |
| 4. | Administration window The administration window displays selected elements and their components. |
Control element basic information
Table sorting
All information on system basic elements (users, organizations, layers, reports etc.) is presented in appropriate tabs in the form of tables. The administrator may perform sorting of available data with use of these tables.
To arrange the information on specific system element, click the tab with this element and click with the left mouse button the column title, the data of which should be sorted. In case of repeated clicking the column title, sorting will be performed in reverse order.
Search box and filter
If the administrator clicks a target tab in the right part of a page, the search box designed for search of specific data in the administration panel becomes accessible.
To search the element, enter the part of its name into the search box, then all elements corresponding to the entered request will be displayed in the administration window. The search can be performed for all system elements.
Besides, the administrator can use a filter, which is located under the search box. It is necessary for data sorting according to specified search criterions.
To receive the most exact search results displayed by the system, the administrator can use the search box and filter simultaneously (where two tools are accessible simultaneously). The filter is not accessible in following sections: control (tab "Organization"), layers (tab "Group"), reports (tab "List of reports") and directories (tab "Image").
Adding of new record
To add a new element the user should go to the target section and click "Create" appeared in the window of administration.
In case of clicking this button a new window is opened, in which the user completes required fields for entry and clicks "Save and exit". To cancel adding of a new element click "Cancel".
"Create" is accessible in all sections of unit "Menu", except for sections "Reports" and "Control" (tabs "Right of access " and "Rights to groups").
Record edition
To change data about some element the user should go to the target section, pass the mouse on the line with a
title of the element and click ![]() -
"Edit" located in the right part of the selected line.
-
"Edit" located in the right part of the selected line.
In case of clicking this button, the form is opened in the administration window, in which the user enters new information on the selected element and clicks "Save and exit". To cancel the element edition, click "Cancel".
Besides, the edition form can be opened by double clicking a line with the element name by left mouse button. The user can access edition in all sections of unit "Menu", except for sections "Control" (tabs "Right of access" and "Rights to groups") and "Reports" (tab "Rights to reports").
Record deletion
To delete a specific element the user goes to the target section, passes the mouse on the line with the name of this element and clicks
![]() -
"Delete" located in the right part of the selected line.
-
"Delete" located in the right part of the selected line.
In case of clicking this button a dialog box confirming deletion of the element is opened in the administration window. To delete the element in the system the user clicks "Ок". To cancel deletion click "Cancel".
Besides, the system provides a tool for deletion of several elements at once. To do this the user passes the mouse on lines with these elements and puts a tick against their names. After that "Delete" becomes accessible in the lower part of the administration window. In case of clicking this button a dialog box confirming deletion of selected elements is opened.
The user can delete elements in all sections of unit "Menu", sections "Control" (tabs "Right of access" and "Rights to groups") and "Reports" (tab "Rights to reports").
|
|
Readme! In case of deletion of own user or organization in the administration window, a dialog box appears informing the user about impossible deletion. |
|---|
Data export
"Export" is necessary for data downloading in the form of a separate Excel-file.
If the administrator uses the search box and then clicks "Export", the downloaded Excel-file will contain information only about found elements.
The user can export data from all sections of unit "Menu", except for section "Directories".
User full name
The first element of the toolbar is user full name, in case of clicking of which the administrator goes to page edition of personal data.
Help, map, exit
|
|
Help In case of clicking "Help" the user is readdressed from initial page of the system to page with this manual. |
|---|---|

|
Map The button produces a shift to initial page of the system. |

|
Exit In case of clicking "Exit" located in the right upper corner of the page, the exit from the user account is performed. |
Control

|
In menu entry "Control" the administrator may become familiar with the detailed information about system users, organizations and their rights to groups. |
|---|
In case of going to tabs "Users", "Right of access", "Organizations" or "Rights to groups" the administrator has an access to the following control elements:
Tab "Users"
Tab "Users" contains basic information about registered users of the system. In case of going to this tab the table with the following columns becomes accessible:
- Full name. User name in the full form.
- Login. User name to log in.
- Role. User role in the system (administrator, customer etc.).
- Organization. User membership in organization.
- Administrator. This column includes switches defining presence of rights of administration by the user.
Users control
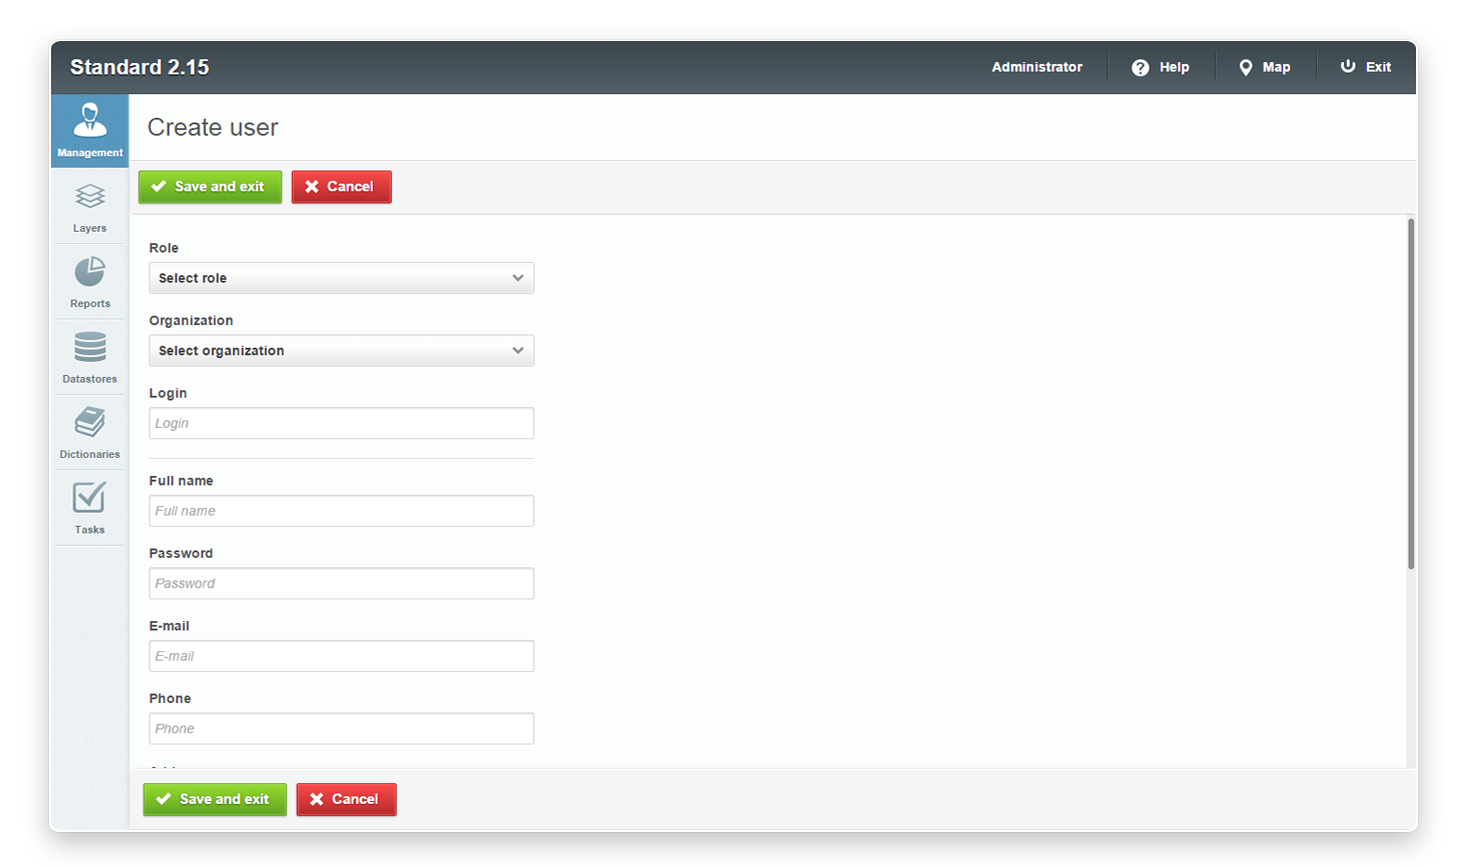
Adding of a new user
For adding a new user in the system click "Create" located on the tab "Users" of menu entry "Control". In case of clicking this button, the form for filling is opened in the administration window, where it is necessary:
- to define a role of the user in system;
- to select the organization to which he will relate;
- to enter personal data of the user (his login, full name, password, e-mail, phone number, address, fax, passport and INN (Tax Payer Id. Number).
Edition of the user information
For change of the user information click "Edit" or make a double click on the line with full name of the selected user. Then the form is opened in the administration window (similar to the form of adding), in which the administrator can complete/change his target fields with the user information.
User deletion
The administrator can delete one or several users simultaneously on the tab "Users". In attempting to delete own user in the administration window a dialog box appears, informing the administrator that deletion is impossible.
User search
In case of going to the tab "Users" the administrator can use the search box for search of users according to their full name or login. To find the user according to the organization, role or rights of administration, it is necessary to use a filter located under the search box.
Tab "Right of access"
Rights of access are rights necessary for the user’s access to system layers. The user can get the following rights: review, edition and control.
The right to review allows the administrator to see a layer on the control bar in the main part of a site. The right to edition enables to add new objects to the layer, and also to edit and delete the old ones. The right to control allows the user to change layer structure, styles, etc.
The administrator may become familiar with the list of rights of the system users on the tab "Rights of access". In case of going to this tab, the table with the following columns becomes accessible in the administration window:
- User. Иser name in the full form.
- Group. Belonging of the user to a group.
- Layer. Name of the layer, to which access is defined.
- Review. The column has switches, with which the administrator specifies, whether the selected user has a right to review.
- Edition. The column has switches, with which the administrator specifies, whether the selected user has a right to edition.
- Control. The column has switches, with which the administrator specifies, whether the selected user has a right to control.
Control of rights of access
The administrator can use the search box on the tab "Rights of access" and also a tool for data export.
The administrator can find the user according to the name of the layer by means of the search box. To find the user according to the group of layers, organization or his full name use the filter located under the search box.
Control of organizations
The administrator can use the search box on the tab "Organization" and also tools for adding new organizations, edition and deletion of already existing organizations.
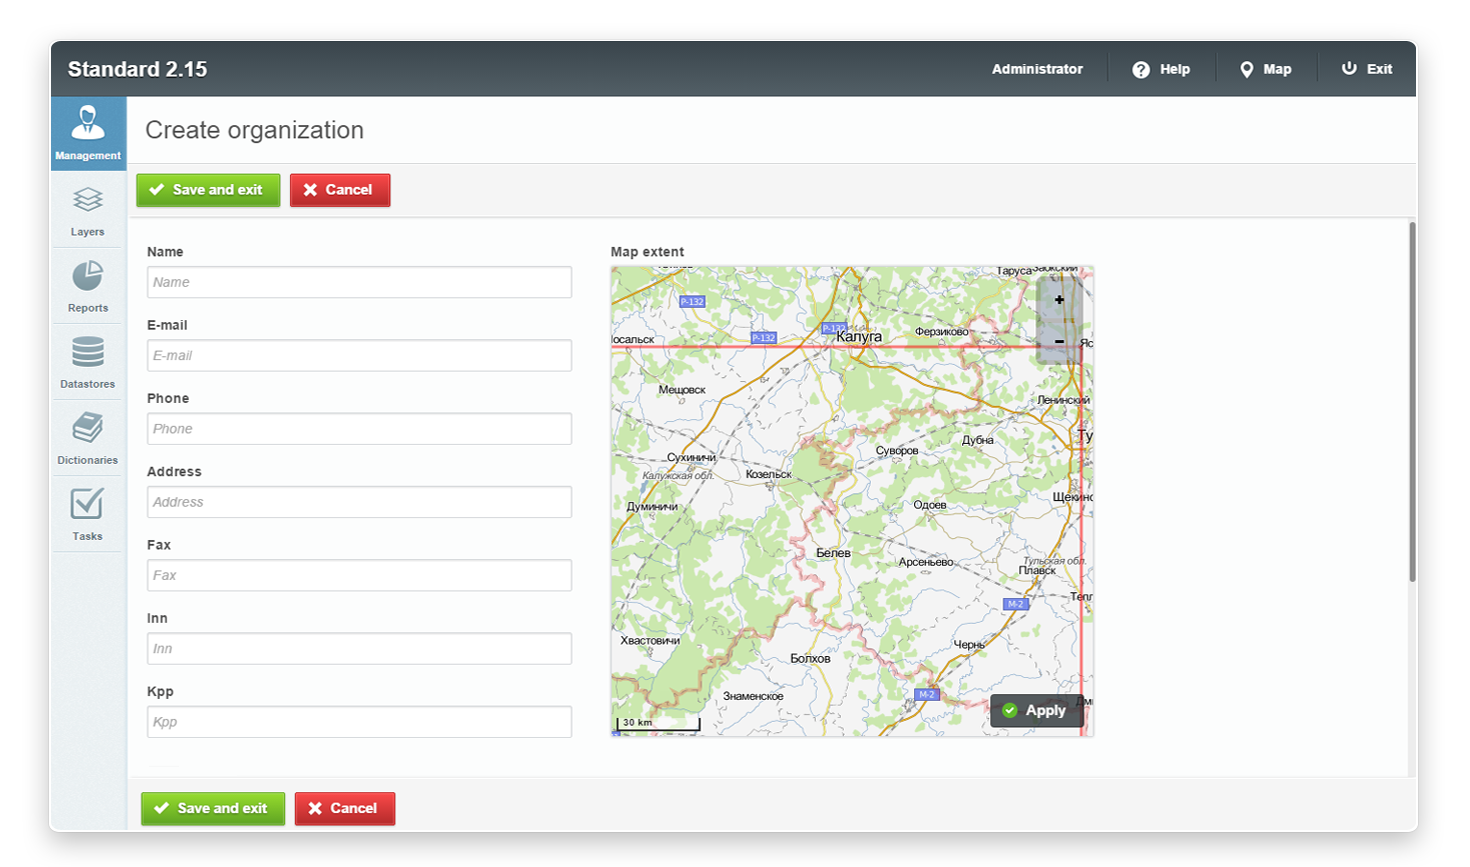
Adding of a new organization
For adding of a new organization in the system click "Create" button, which is located on the tab "Organization" of menu entry "Control". In case of clicking this button in the administration window a new window is opened, in which fields offered for entry are completed.
To the right of the fields for entry a «Visible area» is located, which represents boundaries of the map, which will be visible to users of the organization in case of logging in. The administrator can use a scale for a distance or approach of the map, and also to change position of the map, pressing and keeping pressed left mouse button. Having selected a necessary type, the administrator can click "Apply" for application of new boundaries of the map.
Organization edition
The administrator can edit information on the system organizations on the tab "Organization". In case of clicking "Edit" (or in case of double click on the line with the selected organization) the form (with the same fields, as in the form of adding) is opened, in which the administrator can complete/change the target fields with the information about the organization.
Organization deletion
In case of going to the tab "Organization" the administrator can delete one or several organizations simultaneously. In attempting to delete own organization, a dialog box appears in the administration window, which informs the administrator that such deletion is impossible.
Organization search
In case of going to the tab "Organization" the administrator can use the search box for search of organizations according to their names.
Tab "Rights to groups"
Rights to groups are rights of users of any organization to adding layers in the specified group. In case of going to this tab a table with the following columns becomes accessible in the administration window:
- Organization. Organization name.
- Group. Name of the group, with which users of the organization can interact.
- Access. This column includes switches, with which the rights of organizations to adding a layer are defined
Control of rights to groups
The administrator can use the search box on the tab "Rights to groups" and also a tool for data export.
The administrator can find an organization according to its name by the search box. To find the organization according to group of layers, use the filter located under the search box.
Layers
|
|
The menu entry "Layers" is necessary for work with system layers and their groups. |
|---|
In case of going to tabs "Layers" or "Groups" the following control elements become accessible to the administrator:
"Layers" tab
The administrator can become familiar with the detailed information about system layers on the tab "Layers". In case of going to this tab the table with the following columns becomes accessible in the administration window:
- Type. Geometry type, with which the object of a layer acquires a certain form on the map.
- Name. Name of system layers.
- English name. English name of layers.
- Group. Belonging of the layer to certain system group.
Geometry type
Geometry type can be:

|
Pont |
|---|---|

|
Line |

|
Polygom |

|
Figure |
Control of layers
In case of going to the tab "Layers" the administrator can use the search box and also tools for creation of new layers and edition/deletion of already existing ones.
Adding of a new layer
For adding of a new layer in the system click "Create" located on the tab "Layers". In case of clicking this button the form is opened in the administration window, in which it is necessary to complete the following fields:
- layer name (in case of completion of this field, the field "English name" is automatically completed);
- group, in which the layer will be displayed;
- data repository (that is a database of the layer repository);
- geometry type (point, line, polygon);
- style (basic, simple, expanded).

Adding of a new layer: object styles
In case of creation and edition of the layer the user can select one of the following styles:
- Basic. Style by default, i.e. point, line or polygon.
- Expanded. The style formed by means of geocss language. When choosing this style in the administration window, a separate form appears with the code to the right of fields for entry.
- Simple. The style, in which the administrator selects an attribute for subscription and specifies a color for it, background, transparency and size.
In case of choosing a simple style and geometry type "Point" the user can specify a form of display of points for each object (circle, triangle, square) or select a style with an icon. However, color and the size of a background is specified at the discretion of the user, and also inking of figures is performed.
If as geometry type to select a line the user can independently select color and the size of a background. To specify a color for stroke select an appropriate parameter "Stroke".
If you select a polygon as a geometry type, the user can specify not only colors and sizes for the stroke, but also transparency for a background.
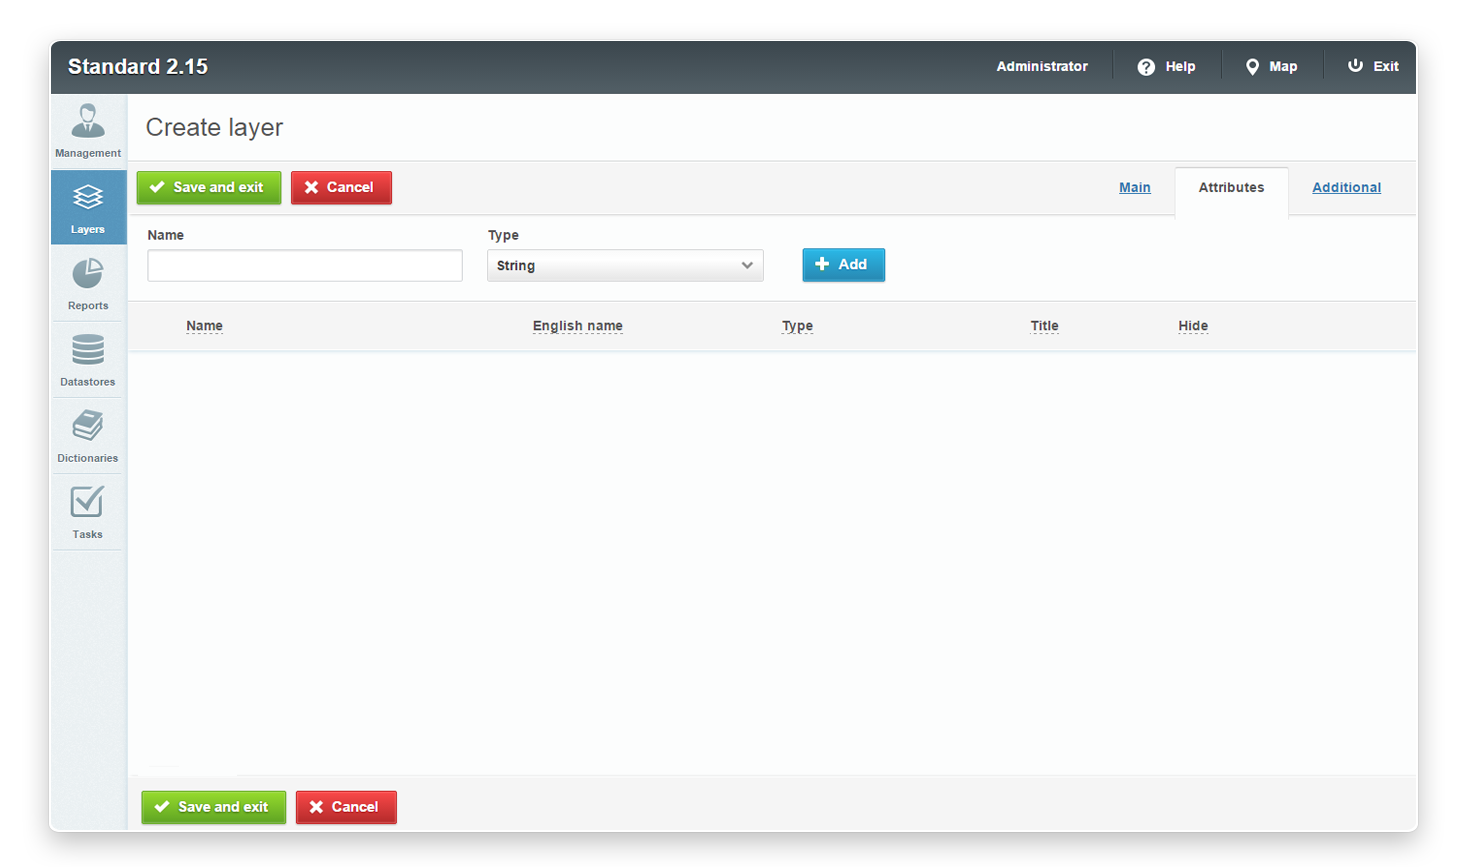
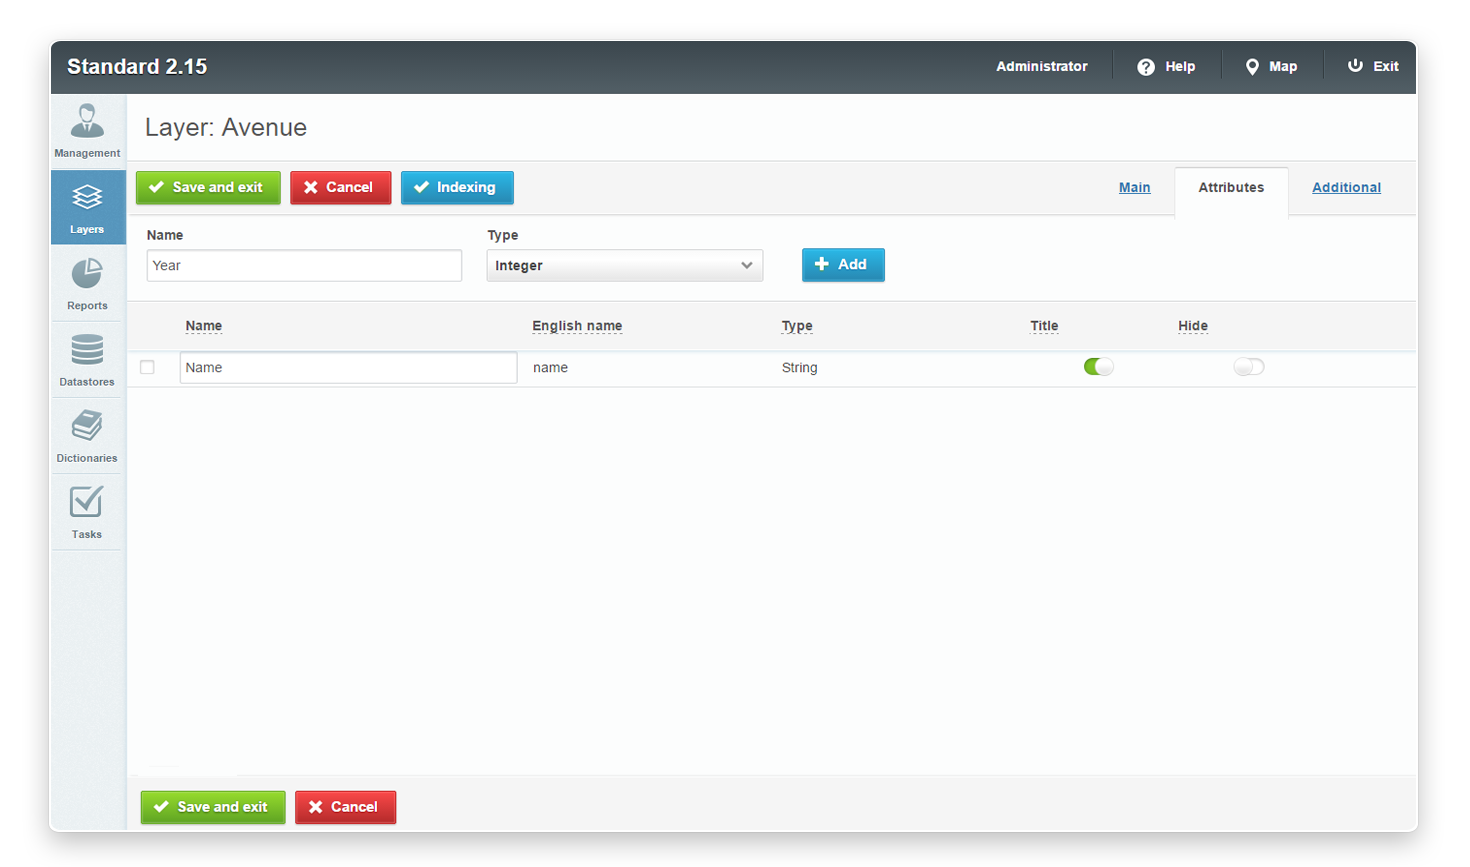
Adding of a new layer: attributes
For adding new attributes to the created layer, the administrator shall go to the tab "Attributes" located in the window of layer creation.
In case of going to this tab a table and form with two fields appear in the administration window: name of the attribute and its type. To add a new attribute the user shall complete these fields and click "Add", then the created attribute is displayed in the first line of the table. The administrator can do the following actions here:
- change of a name of the attribute;
- definition of the attribute type (line, integer, floating-point number);
- definition of additional functions of the attribute (whether it is a name and whether it will be shown in the main part of the site).
For adding of the following attribute the administrator has to complete the form with fields and click "Add" repeatedly.
Adding of a new layer: additional fields
The user can add the additional information to a created layer, which will be displayed in the information window in the form of the list. For this purpose the administrator goes to the tab "Additional information" located in the window of layer creation.
In case of going to this tab the administrator completes mandatory fields for entry (if any) and for saving of introduced changes to click "Save and exit".
Layer edition
For change of information about the layer click "Edit" or click on a line with a name of the selected layer twice. Then the form (similar to the adding form) is opened in the administration window, in which the administrator can complete/change his target fields with information about the layer.
Layer edition: indexing
In the process of layer edition the administrator can click "Index". In case of clicking this button, the information is fully updated in the selected layer to the full extent. The administrator can use this button in case of adding new information and its temporal absence in search results.
Layer edition: attributes
For change of the information on attributes of the layer click "Edit" on the tab "Attributes" in the layer edition window. The administrator gets access to fields for adding new attributes and edition of already existing attributes. The administrator can use a tool for deletion of one or several attributes.
Layer edition: additional fields
For edition of the additional information the administrator goes to the tab "Additional information" located in the layer edition window. In case of going to this tab the administrator can enter new information into target fields for entry.
For successful layer edition, complete mandatory fields (if any) and click "Save and exit". To cancel the layer edition, click "Cancel".
Layer edition: clustering
If the administrator selects a dotted layer for edition (i.e. a layer with geometry type "Point") then a tab "Clustering" appears together with tabs "Core" and "Attributes" in the administration window.
In case of going to this tab the form is opened in the edition window, in which the user can include clustering, specify a maximum zoom and also create a new cluster. The columns with the following titles become accessible: a quantity of objects, image and color of the signature.
For adding of a new cluster:
- enter in the field for entry a certain amount of objects, which will be contained in this cluster;
- select the image to be displayed on the map;
- specify color of the signature;
- click "Add".

The column “Amount of objects” displays the range of quantity of objects, which corresponds to a specific cluster. If there is number 5 opposite the first cluster, 10 is opposite to the second cluster and 15 is opposite to the third cluster, that means, that up to 5 objects are included to the first cluster, from 6 to 10 objects are included to the second cluster, from 11 to 15 objects are included to the third cluster. However, if the third cluster with 15 objects is the last one in the list, there will be no definite number of objects for him.
Images of clusters, which are accessible in case of review of the map, are in the column "Image". And the column «Colour of the signature» displays colors, which the signature shall have.
Layer deletion
The administrator can click buttons for deletion of the information about system layers on the tab "Layers".
Layer search
In case of going to the tab "Layers" the administrator can use the search box for search of a layer according to its name. To find a layer according to a group, data repository, according to geometry type or bitmap image, use the filter located under the search box.
When choosing the filter "Bitmap" a form appears in the search window, in which the user puts a tick against the name of the filter to perform sorting. Then only the layers, in which images are specified as a geometry type, are displayed in the administration window. If the user deletes a tick by repeated clicking the form, all the layers, except for those, which have images specified as a geometry type, will be displayed in the administration window.
Layer downloading
To download a layer in the system click "Download" button located among elements of the tab "Layers".
In case of clicking this button in the administration window, a pop-up window is opened, in which the user can select a layer in his computer. Zip shape layers and also tiff files can be downloaded.
When the user downloads a layer, the same window is opened as in case of the layer edition. However, the attributes (if any) are specified automatically. Besides, the administrator can select a data repository in the list on the tab "Basic data".
Control of groups
In case of going to the tab "Groups" the administrator can use the search box and also tools for creation of new groups and edition/deletion of already existing groups.
Adding of a new group
For add a new group in the system click "Create" located among elements of menu entry "Layers". In case of clicking this button a new window is opened in the administration window, in which the user can enter the name of a new group.
Group edition
In case of group edition a new window with the following tabs is opened in the administration window: basic data and layers.
The administrator can edit the group name on the tab "Basic data". In case of going to the tab "Layers" the administrator can look through the information about the layers pertaining to this group (sequence number, title and name in English).
To change positions of the layers the user clicks the layer name with left mouse button and keeping the button clicked moves the layer on the necessary line.
Group deletion
The administrator can delete information about system groups on the tab "Groups".
Group search
In case of going to the tab "Groups" the administrator can use the search box for search of groups according to their names.
Reports
|
|
In menu entry "Reports" administration of report templates of JasperReports, is performed, which will be displayed in the system afterwards. |
|---|
In case of going to the tab "Rights to reports" the administrator gets access to the following control elements:
In case of going to the tab "List of reports" the administrator gets access to the following control elements except for the above elements:
"List of reports" tab
The administrator can become familiar with all reports of the system on the tab "List of reports". Names of reports are reposited in the column "Name". The administrator can download new reports and edit/delete already existing reports here.
JReportInCache downloading
To download the report in the system, click "Load" button located among elements of menu entry "Reports". In case of clicking this button a pop-up window appears in the administration window, in which the user can select a report in his computer. Jrxmlfiles can be downloaded.
When the report is downloaded in the system, a window with the report name, repository and variables is opened in the administration window. First the user enters the report name, according to which it can be found in the system. Then the user can select a repository in the list of databases.
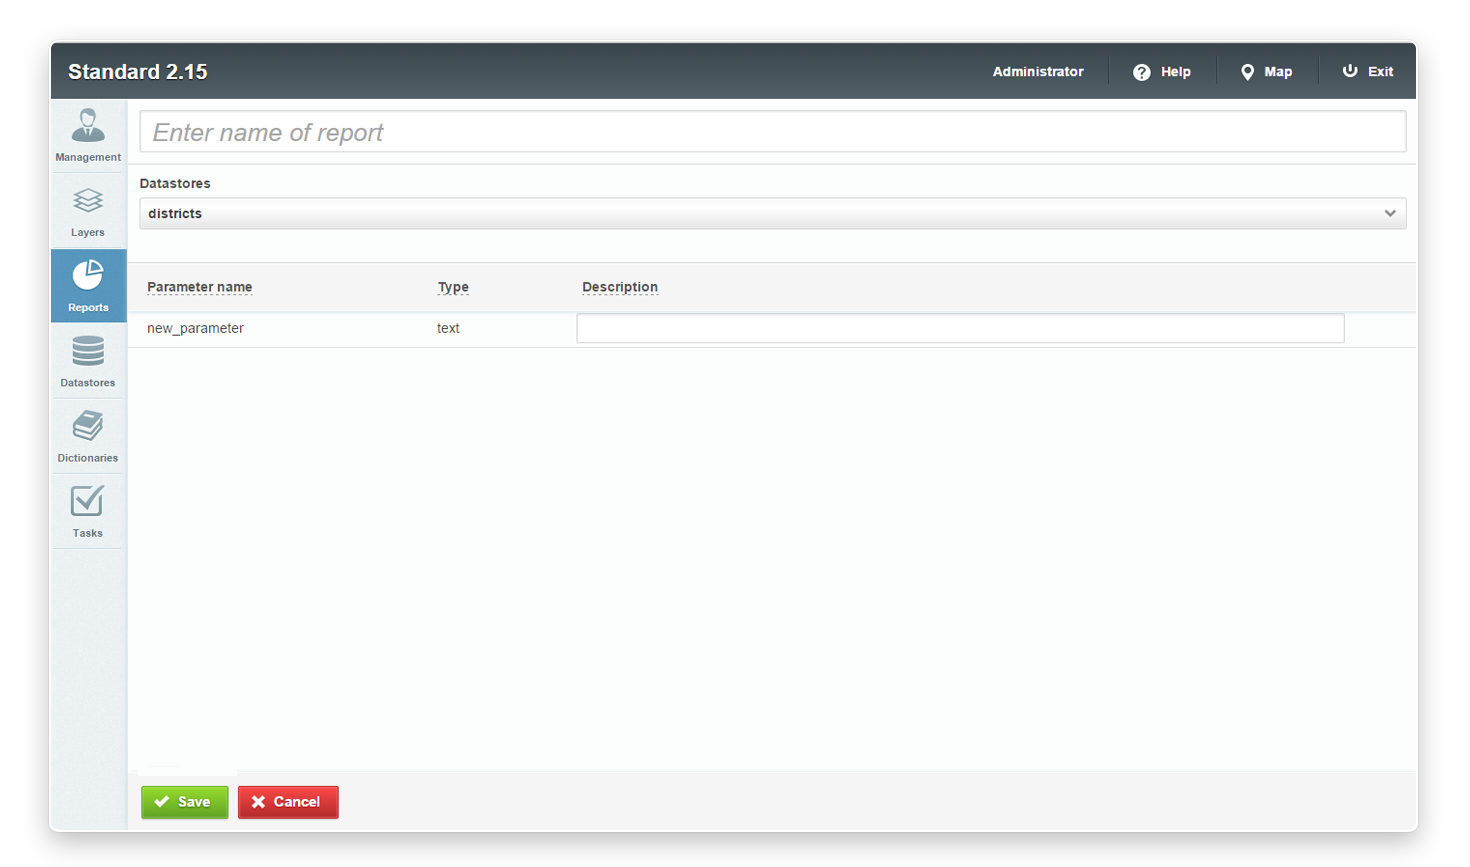
The user cannot edit given data in columns "English name" and Type". However, the user can enter the name of variables in Russian in column "Russian name". These names will be displayed in the process of report review.
JReportInCache edition
In case of going to the tab "List of reports" the administrator can edit reports. In case of clicking "Edit" (or in case of double clicking the line with the selected report) the form is opened (with the same fields, as in the form of downloading) in the administration window, in which form the administrator can complete/change his target fields with information about the selected report.
JReportInCache deletion
The administrator get access to deletion button (including the button for deletion several records at once) on the tab "List of reports". In case of clicking one of these buttons in the administration window a dialog box confirming deletion of selected reports is opened.
JReportInCache search
The administrator can use the search box for search of reports according to their names on the tab "List of reports".
"Rights to reports" tab
In case of going to the tab "Rights to reports" columns with the following names appear in the administration window:
- User. User name in the full form. Full names are duplicated in this column, as all reports existing in the system are assigned to each user.
- JReportInCache. JReportInCache name.
- Review. This column includes switches, with which the administrator decides, whether this report will be accessible to the specified user for review in the information window.
Search of rights to reports
In case of going to the tab "Rights to reports" the administrator can use the search box for search of reports according to their name and also the filter, with which search according to full names of users can be carried out.
Repositories
|
|
In menu entry "Repositories" the administrator can become familiar with the detailed information about data repositories. |
|---|
In case of going to the tab "List of repositories" the administrator gets access to the following control elements:
"List of repositories" tab
In case of going to the tab "List of repositories" a table with the next columns appears in the administration window:
- Name. Repository name.
- Host. Domain name of a repository.
- Database. Database name.
- By default. If there is a tick against the column "By default", that means that in case of creation or downloading of the layer (report) the system automatically transfers the layer (report) to the repository by default (if the user did not select a specific repository from the list).
Repository control
The administrator gets an access to the search box on the tab "List of repositories" and also tools to add new repositories and edit/delete already existing ones.
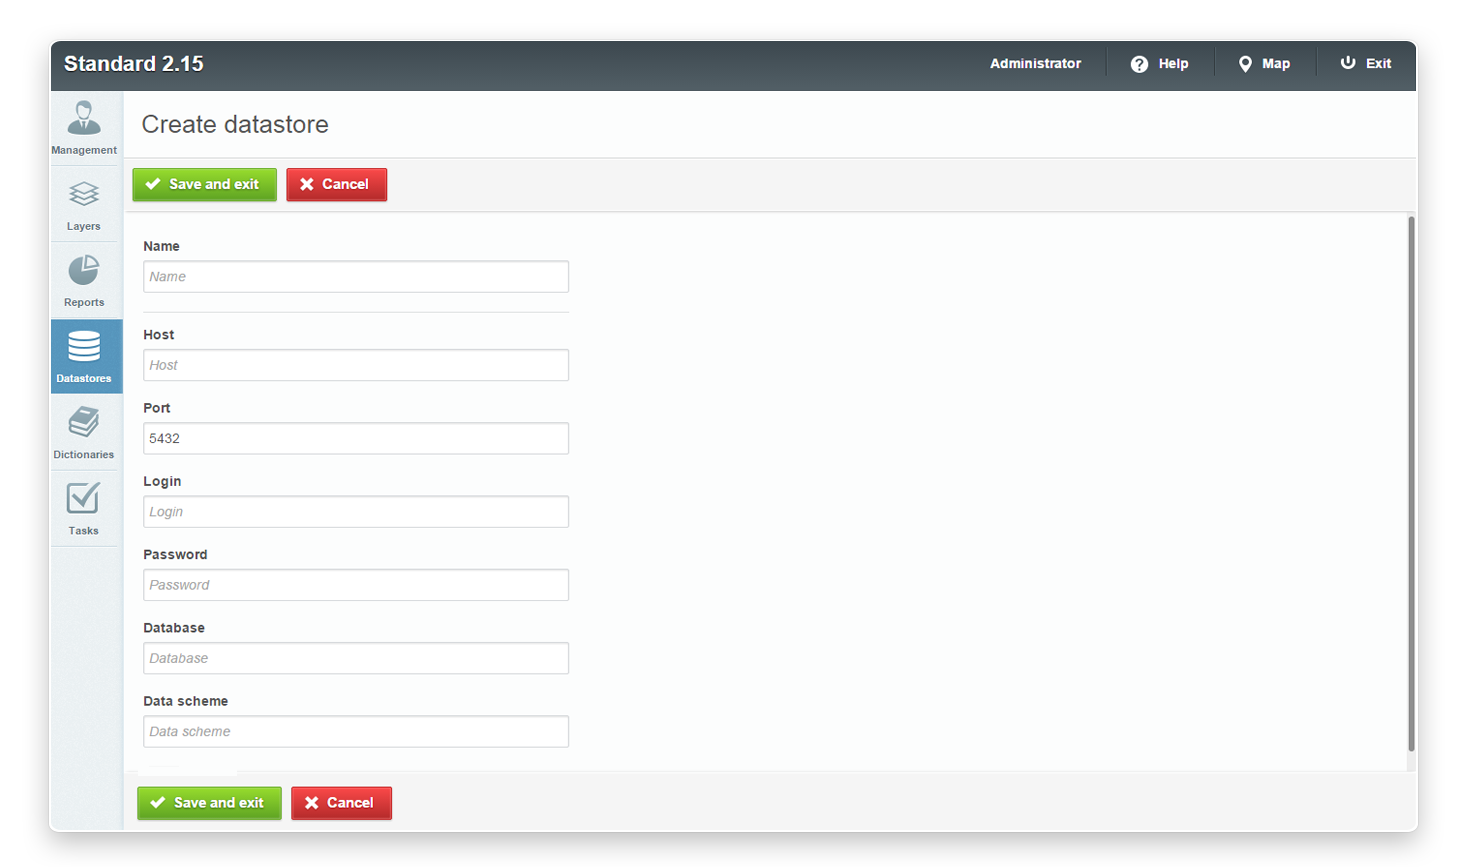
Adding of a new repository
For adding of a new repository in the system click "Create" located among elements of the tab "List of repositories". In case of clicking this button a new window is opened in the administration window, in which the fields for entry are completed:
- repository name
- host
- port
- user name
- password
- databse
- schema name
Repository edition
In case of going to the tab "List of repositories" the administrator can edit repositories. In case of clicking "Edit" (or in case of double clicking the line with the selected repository) the form (with the same fields, as in the form of adding), in which the administrator can complete/change the target fields with information about the selected repository, is opened in the administration window. The administrator can edit all the fields, except for the field "Name".
Repository deletion
The administrator gets access to deletion button (including a button for deletion several records at once) on the tab "List of repositories". In case of clicking one of these buttons in the administration window, the dialog box is opened, in which deletion of the selected repositories shall be confirmed.
Layer publication
To publish a layer in the system pass the mouse on the line with a repository name and click the button
 - "Accessible tables"
appeared on the right side. In case of clicking this button, a new window is opened, in which the administrator
can become familiar with a complete list of accessible layers of a repository and also their types (point, line, polygon).
- "Accessible tables"
appeared on the right side. In case of clicking this button, a new window is opened, in which the administrator
can become familiar with a complete list of accessible layers of a repository and also their types (point, line, polygon).
Besides, the administrator can view in the opened window, what layers are accessible for publication and which of them are already published.
So, there is a sign  against the name of published layers
and there is button "Publish" to the right of the names of unpublished layers in the column "Published".
against the name of published layers
and there is button "Publish" to the right of the names of unpublished layers in the column "Published".
In case of clicking "Publish" the administrator passes to the window of the selected layer edition. The administrator selects a group in the opened window, in which group the layer will be published, defines its style, changes the name and also adds new attributes (in the tab "Attributes") and additional fields (in the tab "Additional information") .
To publish a layer in the system, complete target fields for entry and click "Save and exit". To cancel the layer publication, click "Cancel".
Repository search
The administrator can use the search box in menu entry "Repositories" for search of a repository according to its name, name of databases or host number. Besides, the search can be performed by means of the filter "From the infrastructure", which allows to find repositories working with system MapEditor.
Directories
|
|
In menu entry "Directories" the administrator can become familiar with the detailed information about icons and additional fields of the system. |
|---|
In case of going to tabs "Image" or "Fields" the administrator gets access to the following control elements:
Tab "Image"
In case of going to the tab "Image" the administrator gets access to the table with the following columns:
- Name. Icon name.
- Image. Icon, which can be used in the process of creation of styles and also in the process of adding of clustering to dotted layers.
Image control
The administrator can use the search box on the tab "Image" and also tools for adding new icons and edition/deletion of already existing ones.
Image adding
To add a new image click "Create" button located among elements of the tab "Image". In case of clicking this button, the window is opened in the administration window, in which the user can enter the name of an icon and download image by clicking the appropriate form of downloading.
Image edition
In case of going to the tab "Image" the administrator can edit icons. In case of clicking "Edit" (or in case of double clicking the line with the selected icon) in the administration window the form (with the same fields, as in the form of adding) is opened, in which the administrator can complete/change the target fields with information about the selected icon.
Image deletion
The administrator can click deletion button (including the button for deletion several records at once) on the tab "Image". In case of clicking one of these buttons in the administration window the dialog box confirming deletion of selected icons is opened.
Image search
The administrator can use the search box for search of images according to their names in menu entry "Image".
Tab "Fields"
The administrator can review additional fields on the tab "Fields", which are displayed on the tab "Additional information" in case of layer creation or edition and also in the information window of the сlient part of the site. In case of going to the tab "Fields" the administrator gets access to the table with the following columns:
- Name . Name of the additional field.
- Type. Data type (line, integer, double, list, condition, date).
- Default value. Data initially specified in the additional field
- Required field. This column includes switches, with which the administrator defines, whether the selected field will be required.
- Displayed.This column includes switches, with which the administrator defines, whether the selected field will be displayed on the tab "Additional information" in case of layer creation or edition and also in the information window of the client part of the site.
Field control
The administrator can use the search box and also tools for adding new fields and edition/deletion of already existing ones on the tab "Fields".
Adding of a new field
The administrator can add a new field for entry of the additional information about the created layer on the tab "Fields". For this purpose he clicks "Create" button located among elements of the tab "Fields".
In case of clicking this button the window of a field creation is opened, in which the user completes fields for entry:
- field name;
- choose the type (string, integer, dpuble, date, condition, list);
- decide whether the field is required and whether it will be shown in the information window in the client part of the website
New fields for entry appear in the form subject to the selected type of the field. For example, if the administrator added the field with type "String", the following fields for entry appear in the form:
- field validation;
- minimum length of a line;
- maximum length of a line;
- default value .
Field edition
For change of the information about additional field click "Edit" or make a double click on the line with the name of the selected field. After that, the form (similar to the adding form) is opened in the administration window, in which form the administrator can change target information about additional fields.
Field deletion
The administrator can delete additional fields on the tab "Fields".
Field search
The administrator can use the search box for search of additional fields according to their names on the tab "Fields". Besides, the administrator has the filter located under the search box, with which a search of additional fields in the following criteria can be performed: "Field type", "Mandatory field" and "Displayed".
Tasks
|
|
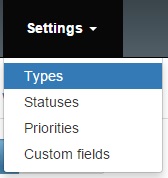
In menu entry "Tasks", the administrator can control parameters of tasks: "Types of operations", "Stages", "Priorities" and "Custom fields". |
|---|
The menu is located below on the left side of page "Control".
In the upper part of the menu the following sections for control are located:
- "Types of operations";
- "Stages";
- "Priorities";
- "Custom fields".
By default, in case of clicking "Tasks", the section "Types of operations" is opened. It is also possible to switch between sections by clicking "Administration" in the upper part of page, a context menu with sections appears
There are 3 control buttons "Create", "Edit" and "Delete" in each of the sections. The active button is "Edit" in all sections by default.

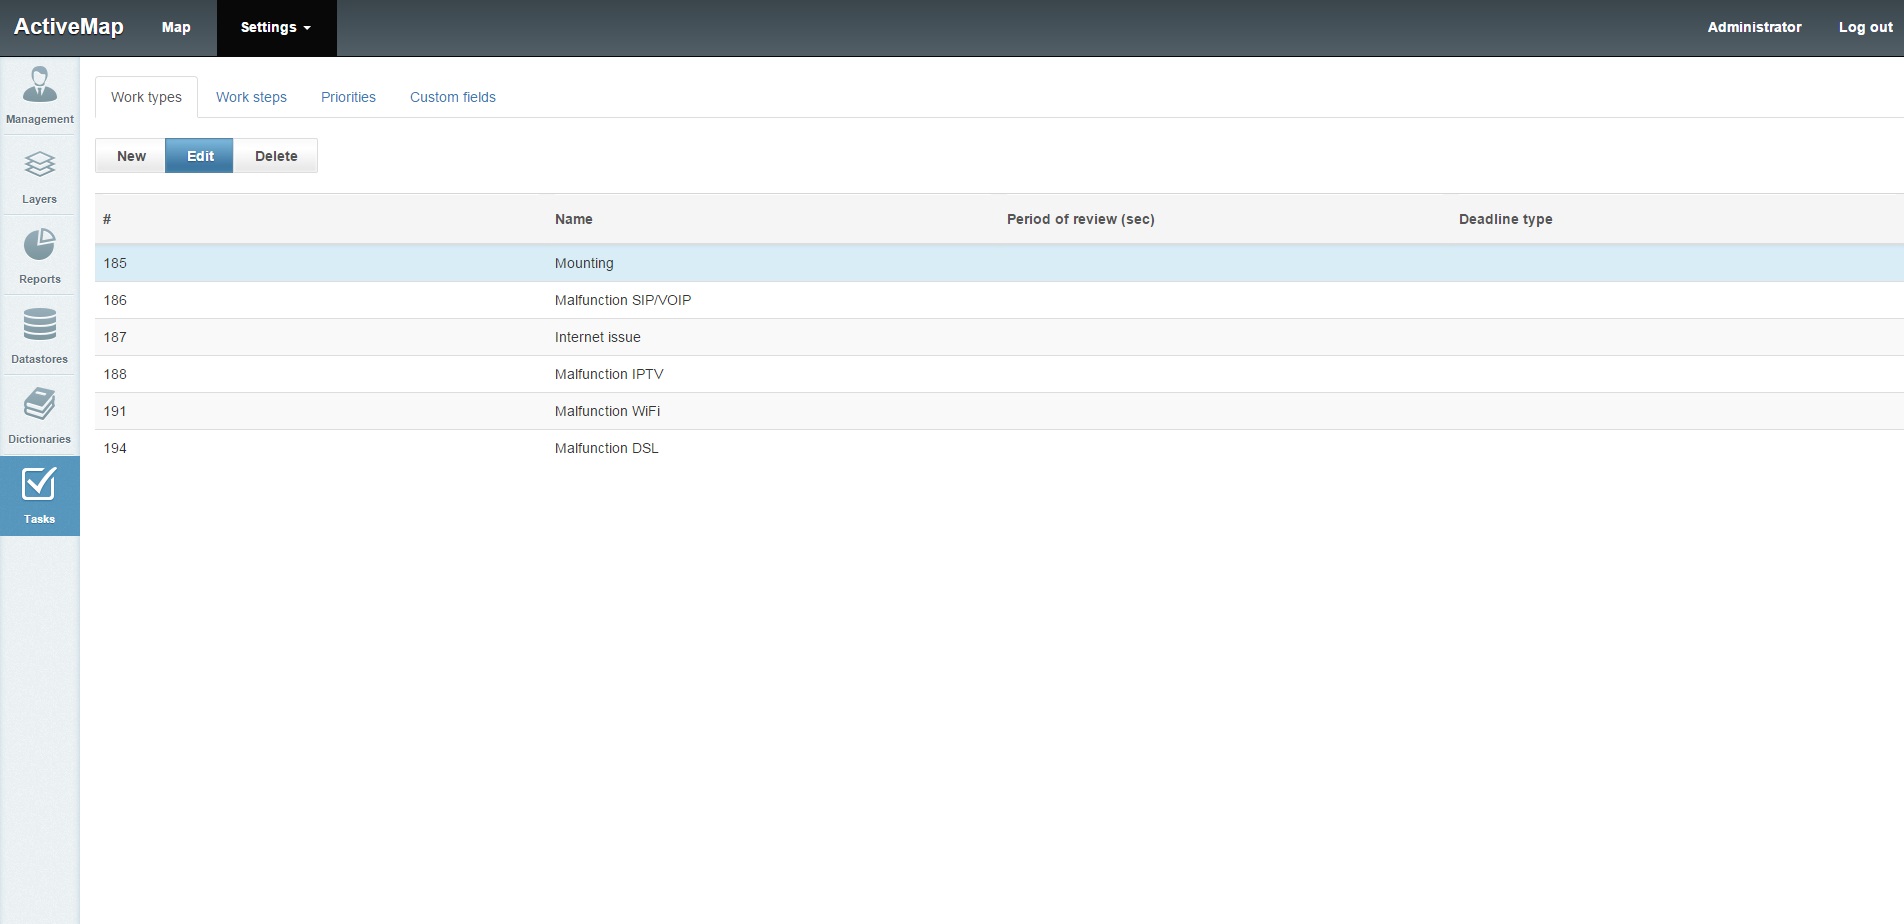
Tab "Types of operations"
This tab includes the list of existing types of operations. The section cap displays properties of types of operations.

For creation of a new type of operations click "Create". The menu is opened, in which it is necessary to complete the following fields:
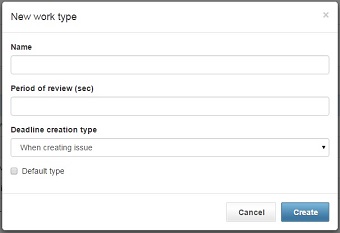
- "Name" is the text name;
- "Analysis period" is time, during which analysis of the operations type is performed;
- "Deadline creation moment" is in what moment in the task with that or other type of operations, deadline is set, "in the process of task creation" or "in the process of task assignment";
- "The type of operations by default" is whether the created type of operations will be used by default;
- "Icon" is an icon of a type of operations;
- "3D icon" is a 3D icon of a type of operations;
- "Icon for the map" is an icon, which will be displayed on the map;
- "Icon for the map (active)" is an icon in the active task;
- "Icon for the map (active, with status "Completed") is an icon on the map subject to task status "Completed".
For edition of an existing type of operations select the necessary type of operations by single clicking of left mouse button, then click "Edit". The menu of the selected type of operations will be opened, where it will be possible to change values of the above fields.
For deletion of an existing type of operations select the necessary type of operations, by single clicking by left mouse button, then click "Delete". In the appeared dialog box, it will be necessary to confirm deletion, by clicking "Yes" or cancel it by clicking "No".
Tab "Stages"
The list of existing stages of operations is displayed in this tab. Properties of stages are displayed in the section cap.

For creation of a new stage click "Create". The menu, in which it will be necessary to complete the following fields, is opened:
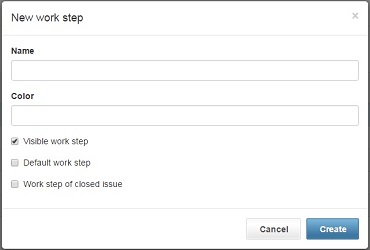
- "Name" is a text name of the stage;
- "Color" - color of stage display in the list;
- "Visible" - whether a created stage will be visible or not;
- "Default stage" - whether the stage will be set as default during task creation or not;
- "Completed task stage" - whether the created stage will mean that the task is completed or not.
To edit an existing stage it is required to select a necessary stage by pressing left mouse button once, then click "Edit". The menu of the selected stage appears, where it will be possible to change values of the above specified fields.
To delete an existing stage it is required to select a necessary stage by pressing the left mouse button once, then click "Delete". In the appeared dialog box it will be necessary to confirm deletion by clicking "Yes" or cancel it by clicking "No".
Tab "Priorities"
The list of existing operation priorities is displayed in this tab. Priority properties are shown in a section headline.

To create a new priority it is required to click "Create". It is necessary to specify only the new priority name in the appeared menu, id and a sequence number will be automatically assigned to it.
To edit an existing priority it is required to select a necessary priority by pressing the left mouse button once, then click "Edit". The menu of the selected priority will appear, where it will be possible to change its name.
To delete an existing priority it is required to select a necessary priority by pressing the left mouse button once, then click "Delete". In the appeared dialog box it will be necessary to confirm deletion by clicking "Yes" or cancel it by clicking "No".
Tab "Custom fields"
The list of existing custom fields is displayed in the given tab. Custom field properties are displayed in the section headline .

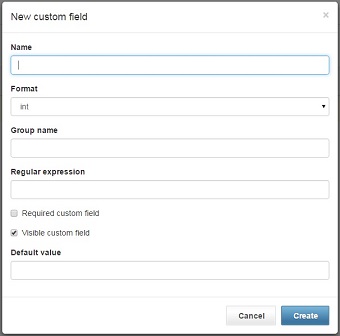
To create a new custom field it is required to click "Create". The menu appears, where it is required to fill in the following fields:
- "Name" - the text name of a field;
- "Format" - select one of possible values (int – an integer; float – a floating-point number; string; bool – truth / falsity (boolean value); date; list; text; geometry).
- "Field groups" - choice of an additional field group;
- "Regular expression" - line pattern that sets an additional field template;
- "Mandatory custom field" - obligation to fill in a created field;
- "Visible custom field" - whether a created field will be visible for users or not;
- "Default value" - default field value indication.
To edit an existing custom field it is required to select a necessary field by pressing the left mouse button once, then click "Edit". The menu of the selected field will appear, where it will be possible to change above specified field values.
To delete an existing custom field it is required to select a necessary field by pressing the left mouse button once, then click "Delete". In the appeared dialog box it will be necessary to confirm deletion by clicking "Yes" or cancel it by clicking "No".
